When installing mosaic tiles, one of the final steps is applying grout to secure the tiles in place and provide a finished look. However, sometimes the grout application can get a little messy, leaving excess grout on the surface of your mosaic tiles.
If not dealt with promptly, this can detract from the overall aesthetic of your project. The guide below will provide step-by-step instructions on how to remove excess grout from mosaic tiles, helping you maintain the beauty and integrity of your tile work.
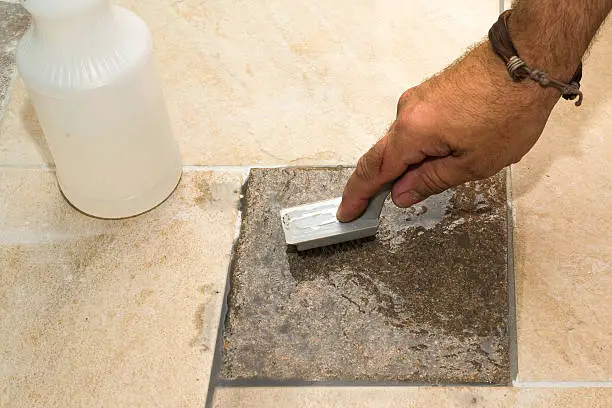
The grout removal process from mosaic tiles involves a few key steps. Firstly, once the grout has partially dried, you’ll want to start with a damp grout sponge or cloth, wiping in a circular or diagonal motion to avoid digging into the grout lines.
Be sure to rinse your sponge or cloth frequently to keep it clean. If you’re dealing with dried grout, a grout haze remover or a grout saw can be used. After removing the excess grout, buff the tiles with a soft cloth to restore their shine.
Materials Needed
Here is a list of all the essential items you will need for the grout removal process:
- Grout Haze Remover: This is specifically formulated to strip off excess grout from tiles. Before you purchase, ensure it is safe to use on mosaic tiles.
- Grout Saw: This tool is ideal for more stubborn grout residues. Be careful not to scratch the surface of your tiles.
- Damp Grout Sponge or Cloth: These are used for gentle wiping of the tiles. Remember to rinse them frequently.
- Scrub Brushes: These brushes help clean grout from grout lines and corners where a sponge might not reach.
- Soft Cloth: This is used for buffing the tiles to restore their shine after the grout removal.
- Bucket of Warm Water: This is useful for frequently rinsing your grout sponge or cloth during the cleaning process.
- Rubber Gloves: To protect your hands from the grout haze remover.
Safety Precautions
When carrying out the grout removal process, safety should be paramount. Here are crucial precautions to consider:
Proper Ventilation: Ensure that the area where you are working is well-ventilated. Some grout haze removers can emit powerful fumes that may be harmful if inhaled in a closed space.
Protective Clothing: Wear rubber gloves to protect your hands from potential skin irritation caused by the grout haze remover. Consider wearing long sleeves and pants to protect your skin. A dust mask is also recommended to prevent inhaling any dust or debris.
Eye Protection: Wear safety glasses to shield your eyes from any grout particles that might be dislodged during the cleaning process.
Proper Use of Tools: Always use your tools as instructed by the manufacturer. The grout saw, for example, should be used with care to avoid scratching your tiles or injuring yourself.
Safe Storage of Cleaning Supplies: Keep your grout haze remover and other cleaning supplies in a safe place, away from children and pets.
Avoid Prolonged Contact: Avoid letting the grout haze remover sit for too long on the surface of your tiles. Doing so may discolor the tiles or damage the grout.
Step-by-step Grout Removal
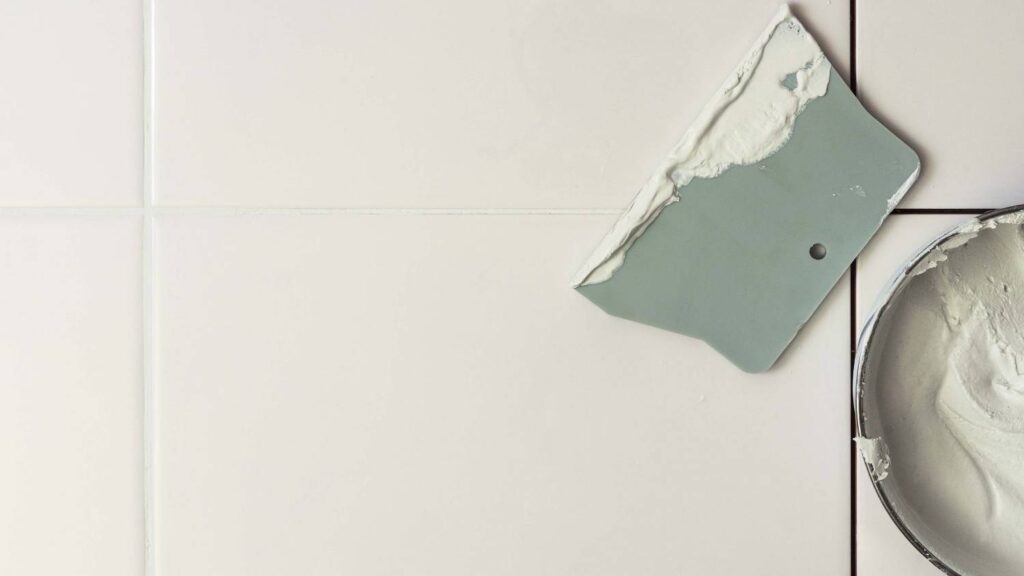
Step 1: Apply the Grout Remover
The first crucial step in removing excess grout from your mosaic tiles is applying the grout remover. Begin by shaking the grout remover bottle well to ensure its components are properly mixed.
Wearing your safety gloves, open the bottle and pour a small amount of the remover onto a clean cloth or sponge.
Next, carefully apply the grout remover to the areas of the tile where the excess grout is present.
Work in small sections to ensure you have complete control over the application process and to prevent the remover from drying out before it can penetrate the grout.
Remember to distribute the remover evenly, focusing on the areas with the most grout. At this stage, it’s important to not let the grout remover sit for too long on the surface, as it may discolor the tiles or damage the grout.
Once applied, allow the grout remover to sit for the time recommended by the manufacturer typically a few minutes before proceeding to the next step.
This waiting period will give the grout remover time to break down the excess grout, making it easier for you to scrub off.
Step 2: Scrub Gently with a Scrub Brush
After allowing the grout remover to seep into the excess grout and break it down, the next step requires gentle scrubbing. For this purpose, a scrub brush or an old toothbrush will work effectively.
Ensure your scrubbing tool is not too harsh to avoid scratching the mosaic tiles.
Start scrubbing in a circular motion, focusing on the areas where the grout remover was applied. The circular motion is more efficient at loosening the grout than a straight back-and-forth motion.
Don’t exert too much pressure while scrubbing as it could damage the tile’s surface or dislodge the grout itself.
Ensure you’re wearing your safety goggles and gloves during this process to protect yourself from any grout dust or remover that may be flicked up during the scrubbing process. Continue in this way until you’ve scrubbed all the treated areas.
After you’ve finished scrubbing, it’s a good idea to let the tiles sit for another few minutes. This gives the grout remover a bit more time to work.
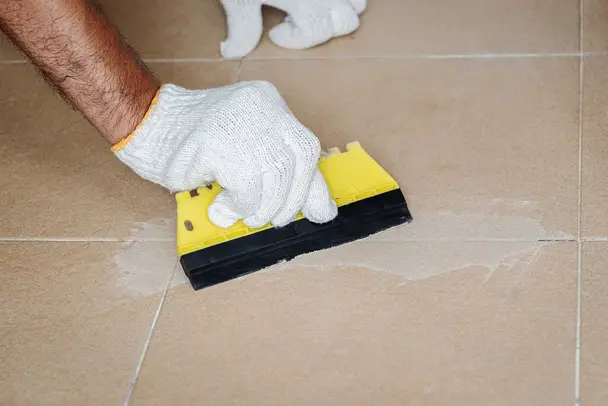
Step 3: Wipe off with a Sponge
The final step in removing excess grout from mosaic tiles involves wiping off the grout residue with a sponge. Start by dampening a large, clean sponge with warm water. Ensure the sponge is saturated but not dripping wet.
Begin wiping the tiles gently, starting from one corner and working your way across the surface in a systematic pattern.
It’s crucial to clean the sponge frequently during this process. Rinse it out under running water, wring it out, and continue wiping. This stops the grout from being spread around and ensures that you’re removing it from the tiles.
Ensure you’re using a light touch to avoid eroding the grout lines. The sponge’s texture is perfect for picking up the loosened grout without scratching the tiles.
Run the sponge diagonally across the tiles and grout lines, as this is the most effective way to clean without digging into the grout itself.
Once you’re done wiping, give the tiles another inspection. If there’s any grout residue left, repeat the wiping process until you’re satisfied with the result. Following the wiping, allow the tiles to dry naturally.
This step concludes the process of removing excess grout from mosaic tiles.
Step 4: Repeat the Process as Necessary
In some cases, a single round of grout removal may not be sufficient to achieve the desired cleanliness and shine of your mosaic tiles. If, upon inspection, you still notice areas with excess grout even after the initial scrubbing and wiping, you should repeat the process as necessary.
Begin again with the application of the grout remover onto the affected areas, giving it time to penetrate and dissolve the hardened excess grout.
Follow this up with meticulous scrubbing using a grout brush, ensuring you cover all trouble spots.
After the scrubbing, let the tiles sit for a few minutes to allow the grout remover to work further. Then, proceed again with the wiping process using a clean, damp sponge. Remember to rinse the sponge frequently to prevent the redistribution of grout onto the tiles.
Be patient and thorough during these repetitions, as rushing can lead to missed spots or potential damage to the tile surface. Repeat this step until you’ve completely removed all excess grout and are satisfied with the look of your tiles.
Step 5: Final Cleaning and Drying
Once you’ve successfully removed all the excess grout from your mosaic tiles, it’s time for the final cleanup. This step is crucial in maintaining the overall appearance and longevity of your tiles.
Begin by thoroughly rinsing off your tiles using clean water and a clean sponge.
This helps ensure that any dissolved grout remover and grout particles are completely washed away. Be careful to avoid vigorous scrubbing during this step, as it may damage the tiles or disturb the grout lines.
After rinsing, use a clean, dry towel to wipe down your tiles. This helps to absorb any remaining water and prevent water spots or streaks from forming on your tiles. It’s best to use a microfiber towel if possible, as they are highly absorbent and gentle on surfaces.
Following the towel drying, let your tiles air dry for at least 24 hours. This allows any residual moisture within the grout lines to evaporate, ensuring the grout sets correctly.
Avoid walking on or disturbing the tiles during this period to preserve your hard work.
As the final step in the grout removal process, inspect your tiles one last time. They should be clean, shiny, and free of any grout residue. If you find any remaining grout, you may need to repeat the removal process in those specific areas.
If everything looks great, pat yourself on the back – you’ve successfully cleaned and restored your mosaic tiles to their original glory!
Related Topics:
Troubleshooting
Regardless of how meticulously you’ve followed the grout removal steps, certain issues may arise during the process. Fear not, for these problems are surmountable with some guidance.
Problem 1: Grout Haze
Despite careful cleaning, a hazy film often called grout haze, may persist on your mosaic tiles. This is typically due to tiny grout particles that have dried on the tile surface.
To tackle grout haze, use a grout haze remover product following the manufacturer’s instructions. Rub the remover gently onto the affected tiles using a clean cloth, then rinse with warm water.
Always test the product on a small, inconspicuous area first to ensure it does not discolor or harm the tiles.
Problem 2: Stubborn Grout Residue
In some cases, grout residue might prove stubborn and refuse to come off easily. In such situations, resort to a grout removal tool, like a grout saw or a rotary tool with a grout removal attachment. Make sure to use these tools cautiously to avoid scratching the tiles or damaging the grout lines.
Problem 3: Dried Grout in Hard-to-Reach Areas
Grout can sometimes dry in crevices and hard-to-reach corners of the mosaic pattern. To remove dried grout from such areas, use a soft toothbrush or a wooden kebab skewer.
These tools allow you to gently scrape the grout out without damaging the tiles.
Problem 4: Grout Color Inconsistencies
Sometimes, you may notice color inconsistencies in the grout, with some areas appearing darker or lighter than others. This is often due to uneven drying or inconsistent mixing of the grout. To fix this, you might need to remove the inconsistent grout and re-grout these areas following the same steps.
Conclusion
In conclusion, removing excess grout from mosaic tiles requires time, patience, and the right tools. Whether you’re dealing with grout haze, stubborn grout residue, dried grout in hard-to-reach areas, or grout color inconsistencies, each problem has a solution.
Following the tips in this guide will help you preserve the beauty and integrity of your mosaic tiles. Remember, the key is to act promptly and use the correct removal techniques to ensure your tiles remain in pristine condition.
FAQs
What should I avoid when removing excess grout from mosaic tiles?
When removing excess grout, it’s crucial to avoid using abrasive tools or sharp objects that could scratch or damage the tiles. Moreover, applying too much pressure could also lead to tile damage. Always opt for gentle methods and tools like a soft sponge, cloth, toothbrush, or wooden skewer, and work slowly to protect your tiles.
I have grout haze on my mosaic tiles even after cleaning them with water, what should I do next?
If water doesn’t remove the grout haze, consider using a grout haze remover. These are specially formulated products available at most home improvement stores. Follow the manufacturer’s instructions on the package to apply it. Make sure to wear protective gloves and ensure the area is well-ventilated while using these products.