Installing mosaic tiles can add a unique touch of elegance and aesthetic appeal to your space. This DIY project may seem challenging at first, but with careful preparation and the right tools, it is achievable. In this guide, we will walk you through the steps on how to install mosaic tiles, transforming your space into a piece of art.
The importance of correct installation cannot be overstated when it comes to mosaic tiles. Proper installation ensures the tiles’ longevity, aesthetic appeal, and overall functionality.
Incorrectly installed tiles can lead to uneven surfaces, loose tiles, and even potential water damage. In addition, poor installation can mar the beauty of the mosaic pattern, ruining the overall effect.
Hence, following the necessary steps and techniques for mosaic tile installation is critical for achieving a flawless finish, preserving the integrity of your design, and ensuring a durable result that stands the test of time.
Materials and Tools Required
Before you start with the installation process, ensure you have the following materials and tools ready for use:
- Mosaic Tiles: Get the mosaic tiles of your choice. Make sure they are of good quality and suitable for the intended space.
- Tile Adhesive: Choose a high-quality adhesive. The adhesive must be appropriate for the type of mosaic tile you are using.
- Grout: Get a grout that matches or contrasts your tiles to enhance the overall visual appeal.
- Notched Trowel: You’ll use this to spread the adhesive onto the surface.
- Grout Float: This is used to apply grout between tiles.
- Sponge and Bucket: These will be used for cleaning excess grout from the tiles.
- Safety Gear: Always ensure you have safety glasses and gloves to protect yourself during the installation process.
- Tile Cutters or Nippers: You may need to cut or shape some tiles to fit your design.
- Measuring Tape and Level: These will help in aligning the tiles properly.
- Tile Sealer: This is optional but recommended for areas that will be exposed to moisture.
Remember to carefully follow the manufacturer’s instructions for the adhesive and grout mixing and usage.
Descriptions of Necessary Tools
Each tool plays a specific role in the installation process of mosaic tiles. Here are brief descriptions of each:
- Notched Trowel: A notched trowel is a crucial tool for spreading tile adhesive evenly across the surface. The notches help in distributing adhesive in a controlled manner, ensuring that each tile adheres firmly to the surface.
- Tile Cutters or Nippers: These are used to cut or shape tiles to fit perfectly into your design. They can cut straight, diagonal, and even circular cuts on tiles. Always remember to use safety glasses when cutting tiles to avoid eye injury.
- Sponge and Bucket: A sponge and bucket are used in the grouting process. The sponge is used to wipe off any excess grout from the tile surfaces, and the bucket holds water for rinsing the sponge. It’s crucial to keep your sponge clean and moist to prevent grout haze.
- Grout Float: A grout float is used to apply and spread grout between the gaps of the tiles. It has a flat, rubber base that allows you to press the grout into the joints and scrape off the excess.
- Measuring Tape and Level: These tools are essential for accurate measurements and leveling of tiles during installation. The measuring tape helps in determining the amount of adhesive or grout needed, while the level ensures that the tiles are aligned correctly.
- Rubber Mallet: A rubber mallet is used to gently tap on tiles to ensure they are firmly adhered to the surface and leveled with each other. It is also used to gently tap on the edges of tiles to ensure they are aligned and evenly spaced.
- Tile Spacer: Tile spacers come in different sizes and shapes and are used to create consistent gaps between tiles for grouting. They guarantee a professional finish by keeping tiles evenly spaced and aligned.
- Grout Sealer: Grout sealer is applied after the grout has dried to protect it from stains and moisture. It’s essential to seal the grout in high-moisture areas such as bathrooms and kitchens.
- Safety Gloves: When working with adhesive or grout, always remember to wear safety gloves to protect your hands from irritation or chemical burns.
- Cleaning Supplies: Lastly, you will need cleaning supplies such as a mop, bucket, and tile cleaner to clean any excess grout or adhesive from the surface of the tiles after installation.
Surface Preparation
Cleaning the Surface

Start the preparation process by thoroughly cleaning the surface where the mosaic tiles will be installed. It’s crucial to eliminate any dust, grease, or any other form of dirt. You can use a simple soap-water mixture and a scrub brush for this purpose.
Allow the surface to dry completely before proceeding to the next step.
Checking for a Level Surface
Using a level, ensure the installation surface is perfectly flat. A non-level surface can result in uneven tile placement, negatively affecting the final look of your project. If there are high spots on the surface, sand them down. For low spots, fill them in with a suitable filler and allow them to dry.
Surface Repair
Inspect the surface for any cracks, holes, or damage. Smaller cracks should be filled with a quality patching compound. If the damage is severe, it may be necessary to install a backer board to provide a stable surface for the mosaic tiles.
Applying a Waterproof Membrane
If you’re installing mosaic tiles in an area exposed to moisture, such as a bathroom or kitchen, applying a waterproof membrane is essential. Some membranes can be painted on, while others are in the form of a sheet that needs to be cut and adhered to the surface.
Marking Your Layout
Using a chalk line or pencil, mark the center of the surface and plan your tile layout from this point. It’s best to start tiling from the center and work outwards, ensuring an evenly distributed pattern.
This preparatory step will reduce measurement errors and will help you visualize the completed installation.
Dry Running
Before you apply any adhesive, it’s recommended to do a dry run. Lay your tiles out on the surface according to your layout markings to ensure they fit correctly. Make any necessary adjustments to the tile positions or cuts at this stage.
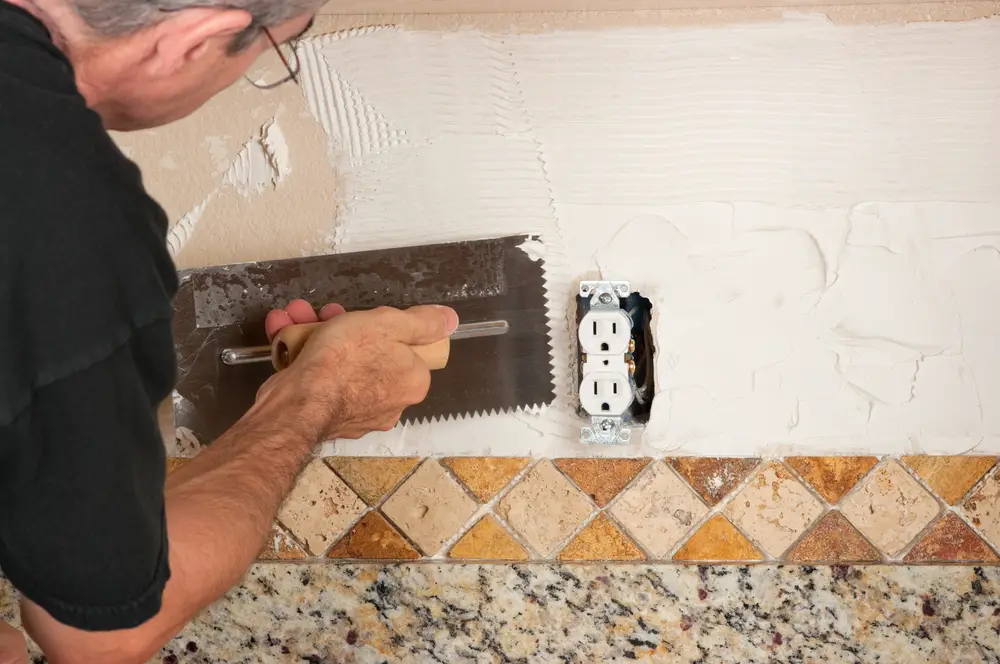
Applying the Adhesive
Applying Adhesive to the Surface
The adhesive is the bonding agent between your tiles and the surface. Use a notched trowel to spread a thin layer of tile adhesive over a small section of the surface, starting from the center and working your way outwards.
The size of the notch in your trowel will depend on the tile size and the manufacturer’s recommendations. Always ensure to mix the adhesive as per the instructions on the package, achieving a consistency similar to peanut butter.
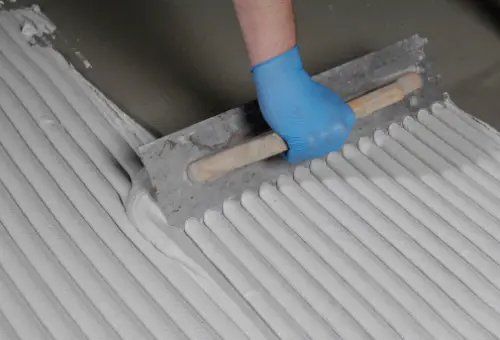
Ensuring an Even Spread
To ensure an even spread of adhesive, hold your trowel at a 45-degree angle and comb it over the applied adhesive.
This creates ridges that will collapse when the tile is installed, providing a more even distribution of adhesive under the tiles. Remember not to cover your layout lines with adhesive so you can still see where to place the tiles. Work in small sections to prevent the adhesive from drying out before the tiles can be installed.
Installing the Mosaic Tiles
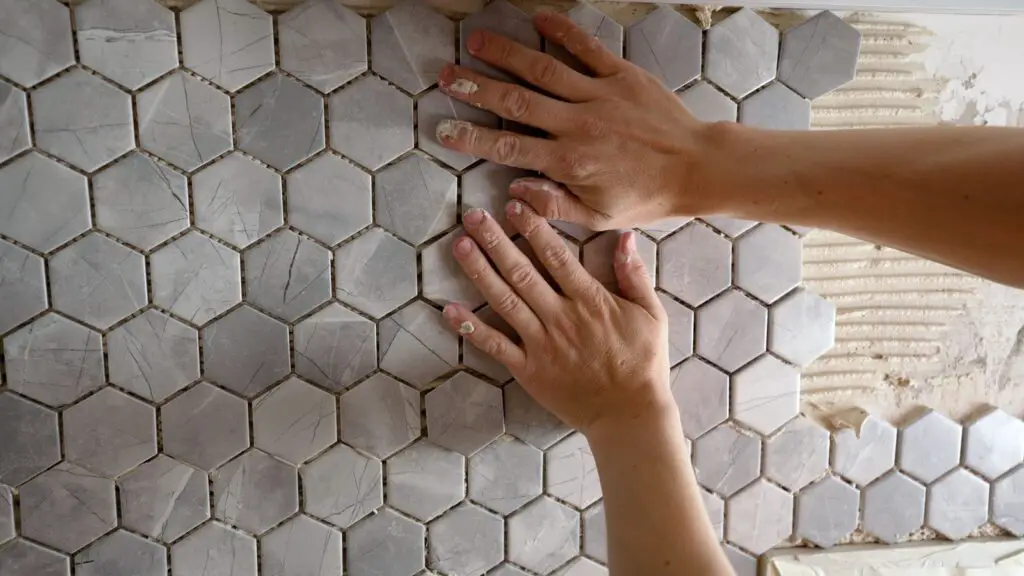
Placing the Tiles
Start by pressing your first mosaic tile sheet into the adhesive, aligning it with the layout lines. Apply firm but gentle pressure to ensure the tiles are set properly.
The mesh backing on the mosaic tiles should almost disappear into the adhesive. Work from the center outwards, placing each sheet to ensure a consistent pattern across your surface.
Adhering the Tiles
Once the tiles are placed, use a clean grout float to firmly press them down. This ensures that all the tiles are at an even level and that they adhere properly to the adhesive. Keep a sponge and clean water handy to immediately clean up any adhesive that oozes up between the tiles.
Advice on Maintaining Tile Alignment and Spacing
Maintaining accurate tile alignment and spacing is crucial for an aesthetically pleasing and structurally sound installation. To achieve this, use tile spacers, available in various sizes, to ensure uniform gaps between the tiles for grout.
Keep checking your alignment with a level and adjust the tiles as necessary while the adhesive is still wet. Remember, patience and attention to detail are key when installing mosaic tiles.
Avoid rushing the process; instead, take your time to place each tile accurately. Lastly, always step back and assess your work from a distance. This will help you spot any misaligned tiles or inconsistencies in the pattern that may not be visible from a close range.
Related Topics:
Allowing the Adhesive to Set
Time Frame for Adhesive to Dry
The drying time for tile adhesive varies depending on the type used and the environmental conditions. However, a standard thin-set adhesive typically requires 24 to 48 hours to fully cure.
It’s essential to allow the adhesive to dry completely before proceeding to the next steps. During this time, avoid any activity that could disturb the tiles or disrupt the curing process.
Tips for Preventing Tile Movement During this Phase
Preventing tile movement while the adhesive is drying is crucial for maintaining alignment and ensuring a successful installation.
To achieve this, avoid walking on or applying pressure to the tiles until the adhesive is fully cured. You can also use a tile leveling system to keep the tiles in place and prevent them from shifting.
If the tiles are installed on a vertical surface, such as a wall, consider using spacers or wedges to hold the tiles in place while the adhesive dries.
Applying the Grout
Steps to Mix and Apply Grout
To mix grout, you’ll need a clean bucket, a trowel, and the grout mix. First, empty the bag of grout into the bucket. Add water gradually and stir until you achieve a thick, paste-like consistency; it should hold onto the trowel without dripping.
Allow the mixture to sit for about 10 minutes for “slaking,” then give it a final stir. Now you’re ready to apply the grout.
Spread it over the mosaic tiles using a grout float held at a 45-degree angle, ensuring it fills all the gaps between tiles. Press firmly, but don’t scrape the tiles. Remove any excess grout from the surface of the tiles with the edge of the float.
Techniques for Ensuring a Smooth, Even Finish
Achieving a smooth, even finish requires patience and technique. After applying the grout, let it set for about 15-30 minutes. Then, using a damp sponge, wipe diagonally across the tiles to remove excess grout from the surface.
Be gentle to avoid gouging the fresh grout lines. Rinse the sponge frequently and change the water often for the best results. As the grout continues to dry, a haze may develop on the tiles.
This can be removed with a soft cloth or a grout haze remover. After 24 hours, the grout should be fully dry, and you can apply a grout sealer to protect your work and extend the life of the grout.
Final Cleaning and Sealing
Instructions for Cleaning Excess Grout from Tile Surfaces
Once your grout lines are smooth and free of excess grout, you’ll want to give the entire surface a thorough cleaning. Dampen a soft, non-abrasive sponge and gently wipe over the tiles to remove any remaining grout haze.
Always wipe in a circular motion, never straight lines, as this could remove grout from the lines.
After the initial clean-up, allow the tiles to dry for about an hour, then wipe down the mosaic tiles again with a dry, lint-free cloth to remove any residual haze. The tiles should be spotless before the application of sealant.
Guidance on Applying a Sealant for Protection and Longevity
Applying a sealant helps protect your newly installed tiles and grout from wear, tear, and moisture. First, make sure the tiles and grout are completely dry and clean. Using a foam brush or a sealant applicator, apply the sealant evenly across the mosaic tiles, ensuring all grout lines are covered.
Work in small sections to prevent the sealant from drying out too quickly. Once the entire surface is covered, wait for the sealant to dry as per the manufacturer’s instructions.
The sealant will not only protect the grout and tiles but also give them a fresh, polished look, enhancing the longevity and vibrancy of your mosaic tile installation.
Conclusion
Installing mosaic tiles is more than just a home improvement project; it’s an opportunity to infuse your style into your space. With this comprehensive guide, you now have the knowledge and steps to install your mosaic tiles successfully.
From preparing the surface, laying the tiles, grouting, and sealing, each stage is vital in achieving a beautiful and long-lasting result.
Remember, the key to a successful installation lies in careful planning, patience, and attention to detail. As you embark on this DIY journey, take your time and enjoy the process. The outcome will be a testament to your hard work and creativity, adding a unique touch of elegance to your home.
FAQs
Can I install mosaic tiles on a painted wall?
Yes, you can install mosaic tiles on a painted wall, but it requires some additional preparation. The painted wall should be sanded lightly to roughen the surface for better adhesive bonding. Also, ensure the wall is clean and free from dust or grease before starting the tile installation.
What type of grout is best for mosaic tiles?
The best type of grout for mosaic tiles depends on the size of your grout lines. For lines smaller than 1/8 inch, unsanded grout is ideal as it is smoother and easier to work into small spaces. For larger grout lines, sanded grout is recommended because it is stronger and less likely to shrink or crack over time.
1 thought on “How To Install Mosaic Tiles: DIY Guide”