Fixing mosaic tiles may seem daunting, but with the right tools and a bit of patience, it can be a rewarding do-it-yourself project. This guide aims to provide step-by-step instructions on how to fix mosaic tiles, ensuring you can maintain the beauty and integrity of your tiled surfaces.
Whether it’s a minor repair or a significant patch-up, these guidelines will turn you into a home repair whiz in no time.
Mosaic tiles are a special type of tile characterized by their small size and the ability to be arranged in a variety of patterns or images. Originally used in ancient times, these tiles are popular for their visual appeal and versatility.
They can add a splash of color, an intricate design, or even a picture to any room. The importance of mosaic tiles is largely in their ability to make a space unique and reflect personal style.
Be it in the bathroom, kitchen, or as an accent wall, mosaic tiles can significantly enhance the aesthetic value of your home.
Materials Needed
- Replacement Tiles: Make sure you have the correct size and color of mosaic tiles to match your existing ones. Depending on the size of your repair, you may need a few or a substantial amount.
- Tile Adhesive: Also known as thin-set mortar, it is used to bond the tiles to the surface.
- Grout: This is used to fill the spaces between the tiles. Choose a color that matches your existing grout.
- Notched Trowel: To apply the adhesive to the surface.
- Grout Float: A rubber tool used to apply grout between the tiles.
- Sponge and Water: For cleaning up excess grout from the surface of the tiles.
- Safety Equipment: This includes gloves and safety glasses to protect your hands and eyes during the repair process.
- Bucket: For mixing the adhesive and grout.
- Tile Spacers: To ensure that the tiles are evenly spaced.
- Tile Nippers: To cut or shape the tiles if necessary.
- Grout Sealer: To seal and protect the grout from moisture and stains after the grout has dried.
Preparing the Surface
Clean the Area:
Start by cleaning the area where the tiles will be affixed. If it’s a repair job, remove any broken tiles and clean the underlayment. Clear away any dirt, dust, or debris as these can compromise the adhesive’s ability to bond with the surface.
Ensure a Smooth and Level Surface:
Use a level to confirm the surface is even. If you find any dips or bumps, fill them in with a suitable filler and sand down any high spots for a smooth finish. This step is vital as an uneven surface can lead to misaligned tiles or tiles that stick out.
Apply a Primer Coat:
Depending on the type of surface, it may be necessary to apply a primer coat to improve the adhesive’s bond. Follow the manufacturer’s instructions for application and drying time.
Plan Your Layout:
Dry-fit your tiles on the surface in your desired pattern before applying any adhesive. This allows you to make any necessary adjustments to the layout and ensure that the pattern works with the area’s dimensions.
Use tile spacers to mimic the spacing that will exist when the tiles are installed.
Mark Your Start Point:
Once you’re happy with your layout, mark your starting point. This is usually the center of the wall or floor, to ensure your pattern is symmetrical. Remove the dry-fit tiles, keeping them in their pattern, and ready for installation.
Setting the Tiles
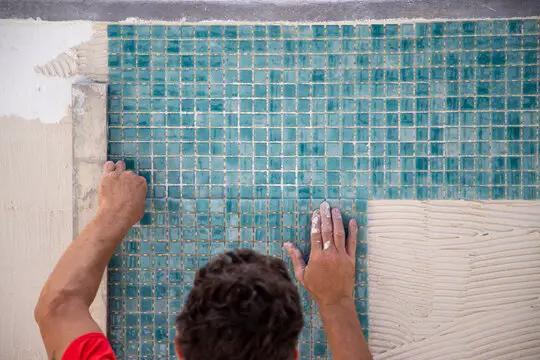
Apply the Adhesive:
Using a notched trowel, spread tile adhesive onto the surface working in small sections so that it doesn’t dry before the tiles are placed.
The grooves created by the notched trowel help to regulate the amount of adhesive that makes contact with the tile, ensuring a strong bond. Avoid spreading too much adhesive, as it will squeeze out between the tiles and create an uneven surface.
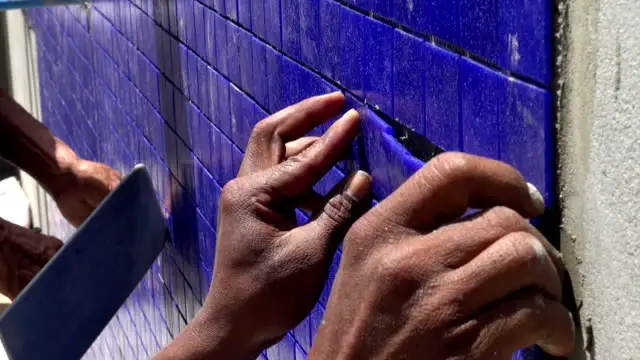
Place the Tiles:
Begin at your marked start point. Press the first mosaic tile sheet into the adhesive, making sure to keep it straight. Push down evenly, making sure that the back of the tiles makes full contact with the adhesive.
Ensure the tiles are level with a spirit level. Repeat this process with each tile sheet, applying a gentle twisting motion to ensure the tiles are securely fixed in place.
Use Spacers:
Place tile spacers between each sheet of mosaic tiles to ensure even spacing for grout. This will help achieve a uniform and professional look. Continue this process, by cutting sheets of tiles to fit in smaller or awkward areas.
Cut Tiles to Fit:
As you reach the edges of your surface or any fixtures, you may need to cut the mosaic tiles to fit. Use a tile nipper to cut individual mosaic tiles to size or a wet saw to cut whole sheets if necessary.
Always remember to wear protective glasses while cutting tiles. Once the tiles are cut, place them into position and make sure they fit snugly.
Wipe Away Excess Adhesive:
As you place the tiles, the adhesive may squeeze out from in between the tiles. Clean this up immediately with a damp sponge to prevent it from drying on the surface of the tiles. Allow the adhesive to set for 24 hours.
Allow the Adhesive to Cure:
Once the mosaic tiles are installed, allow the adhesive to cure fully before grouting. This period could vary from a few hours to a day, depending on the manufacturer’s instructions. Do not disturb the tiles during this time.
Grouting
Prepare the Grout:
Start by choosing the right grout for your mosaic tiles. Generally, for indoor applications, non-sanded grout is best for mosaic projects with grout lines 1/8″ wide. Mix the grout according to the manufacturer’s instructions until it has a paste-like consistency.
Apply the Grout:
Using a grout float, scoop up a generous amount of grout and start spreading it across the mosaic tiles. Ensure the grout is worked into the spaces between the tiles by moving the float diagonally across the tiles.
This will prevent the edge of the float from dipping into the grout lines and removing the grout.
Clean the Surface:
After allowing the grout to set for about 15 minutes (or as per the manufacturer’s instructions), use a damp sponge to wipe off the excess grout from the surface of the tiles. Be careful not to press too hard or you might remove too much grout from the gaps.
Cure the Grout:
Allow the grout to cure for the time specified by the manufacturer. This could be anywhere from a few hours to a few days. During this time, avoid any traffic or disturbance on the surface.
Seal the Grout:
After the grout has fully dried, it’s good practice to seal it. This will prevent water and stains from seeping into the grout and prolong its life. Apply the grout sealant as per the instructions on the packaging.
Polish the Tiles:
Once everything is dry, polish the tiles with a clean, dry cloth to remove any remaining grout haze. With that, you’ve successfully grouted your mosaic tiles, giving them a finished and professional look.
Related Topics:
Cleaning and Maintaining
Cleaning and maintaining your newly fixed mosaic tiles is crucial to preserving their aesthetic quality and prolonging their lifespan. Here are some detailed steps on how to do so:
Regular Cleaning:
Regularly sweep or vacuum the mosaic tiles to prevent dirt and grit from scratching their surface. For a more thorough cleaning, mop the tiles with a mild detergent diluted in warm water. Avoid using harsh chemicals that might damage the grout or the tiles themselves.
Spot Cleaning:
If you notice a spill or stain on your mosaic tiles, quickly blot it up with a damp cloth. Avoid wiping it as that might spread the stain. For stubborn stains, use a non-abrasive cleaner that’s compatible with your tiles.
Grout Maintenance:
Keep an eye on the grout lines. If they appear dirty or discolored, use a grout cleaner to scrub them clean. Reseal the grout every year or as often as recommended by the sealant manufacturer to prevent water and stains from penetrating.
Professional Cleaning:
Consider scheduling a professional tile cleaning service once every year or two. Professionals have special equipment and cleaning solutions that can remove deep-seated dirt and stains without damaging your mosaic tiles.
Preventive Measures:
Use doormats at entrances to catch dirt and grit, and use furniture protectors to prevent scratches. Try to avoid dragging heavy objects across your mosaic tiles.
Conclusion
In conclusion, fixing mosaic tiles is an achievable DIY task that adds significant aesthetic value to any space. By following the detailed steps provided to prepare the surface, set the tiles, apply grout, and maintain the final result, you can give your home a personal touch.
Remember, patience and attention to detail are key, but the rewarding finish of beautifully fixed mosaic tiles is well worth the effort.
Regular cleaning, spot cleaning for spills, and annual professional maintenance will ensure your mosaic tiles remain stunning for years to come. Whether you’re renovating a bathroom, or kitchen, or creating an intricate accent wall, mosaic tiles offer a unique way to express your style.
FAQs
What type of adhesive should I use when fixing mosaic tiles?
It’s generally recommended to use thin-set adhesive when fixing mosaic tiles. The adhesive should be compatible with the type of tiles and the surface where they’ll be installed. Make sure to follow the manufacturer’s instructions for the best results.
How do I ensure my mosaic tiles are placed evenly?
Using a notched trowel can be very helpful in ensuring your tiles are applied evenly. The notches can help spread the adhesive in uniform ridges. Also, spacers can be used between the tiles to ensure consistent gaps, which are needed when it’s time to grout.
How long should I wait before applying grout to my newly laid mosaic tiles?
It’s usually recommended to wait at least 24 hours after setting your tiles before applying grout. This waiting period allows the adhesive to fully dry and set the tiles in place. Always check the adhesive manufacturer’s instructions to ensure the correct drying time.