Cutting marble mosaic tiles is a tactile and engaging process that requires precision and the right tools. Whether you’re working on a home renovation or a new art piece, understanding how to cut marble mosaic tiles can make your work smoother and more efficient.
This guide will provide step-by-step instructions to ensure that your marble mosaic tiles are cut perfectly every time, enhancing the aesthetic appeal of your project.
The proper technique for cutting marble mosaic tiles is crucial not only for achieving precise and clean cuts but also for maintaining safety. Marble, being a hard and brittle material, can easily splinter or chip if not handled correctly, leading to wastage of material and potential damage to the overall design.
Moreover, improper technique can damage your cutting equipment, leading to additional costs and delays.
Safety is another aspect that should never be compromised. Cutting tiles can generate dust which, if inhaled, can cause respiratory issues. There’s also the risk of physical injuries from sharp edges or broken tile pieces.
Therefore, wearing safety goggles, a dust mask, and gloves is paramount to your safety. Following these precautions and techniques will ensure a successful, efficient, and safe tile-cutting experience.
Materials Needed
- Tile Nippers: This is an essential tool for cutting marble mosaic tiles, especially for small cuts or irregular shapes.
- Wet Saw: A wet saw can make clean, straight cuts through the marble tiles. This tool is particularly useful for large volumes of tiles.
- Diamond Blade: To use with the wet saw, a diamond blade is specifically designed for cutting hard materials like marble.
- Work Gloves: To protect your hands from the sharp edges of the tiles and potential flying debris.
- Safety Goggles: These are necessary to safeguard your eyes against dust and debris.
- Dust Mask: To prevent inhalation of dust that could lead to respiratory issues.
- Marker: A marker is needed to mark the lines where you would need to cut.
- Straight Edge or Ruler: To help in making straight lines with the marker.
- Damp Cloth: To clean the marble tiles after cutting.
Types of Marble Mosaic Tiles Suitable for the Task
The type of marble mosaic tiles chosen significantly affects the ease of the cutting process and the final aesthetic outcome. The most suitable types for this task include:
Carrara Marble Tiles: These are white or blue-grey tiles from Carrara, Italy, known for their high quality and easy workability.
Calacatta Marble Tiles: Originating from the Apuan Mountains in Italy, these tiles are white with dark veins, offering a distinct and luxurious look.
Crema Marfil Marble Tiles: These beige-colored tiles are from Spain, and their softer structure allows for easy cutting and shaping.
Emperador Marble Tiles: Available in light and dark shades, these Spanish tiles have unique, complex veining patterns that add depth and richness to any design.
Thassos Marble Tiles: These Greek tiles are pure white, making them versatile for different design aesthetics and comparably easier to cut due to their uniform color and structure.
Safety Precautions
Appropriate Protective Gear
When working with marble mosaic tiles, it’s crucial to prioritize personal safety. The appropriate protective gear includes safety gloves to protect your hands from sharp tile edges and potential flying debris.
Safety goggles are also essential to shield your eyes from dust and debris. Additionally, a dust mask can help prevent inhaling dust particles that could lead to respiratory issues.
Safe Workspace Setup
Setting up a safe workspace is equally important for cutting marble mosaic tiles. The workspace should be well-lit and clutter-free to avoid accidents. It’s recommended to work on a sturdy, flat surface to prevent the tiles from shifting during the cutting process.
Ensure the power cord of the wet saw is safely away from the water supply to prevent electric shocks. Always clean your workspace thoroughly after each session to remove dust and small tile pieces that could pose a hazard.
Preparation
Measuring and Marking the Marble Mosaic Tiles
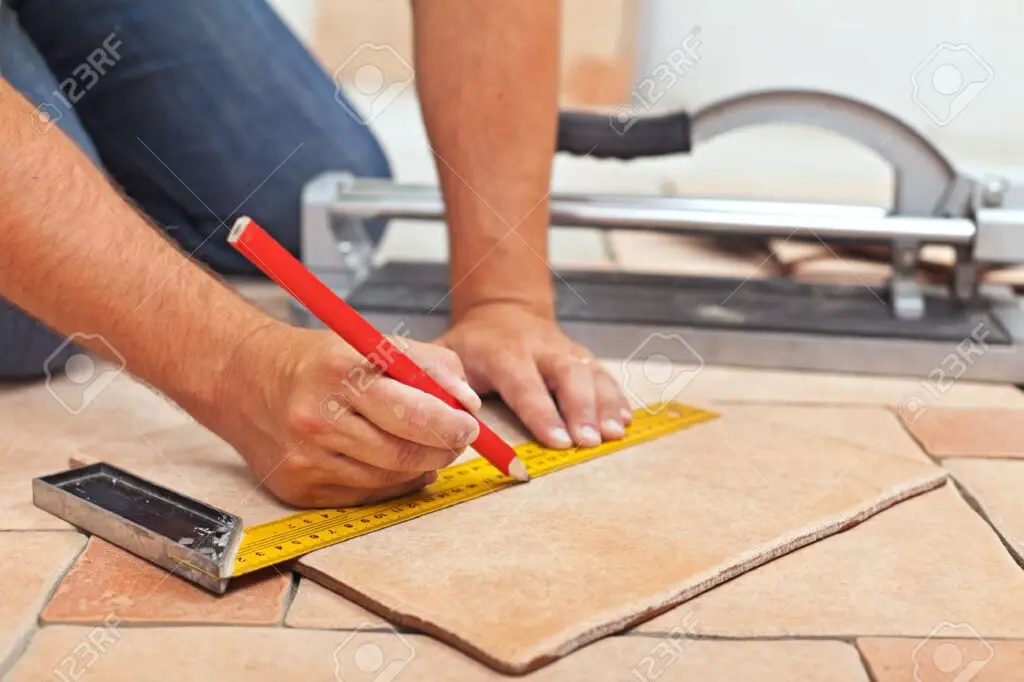
Proper measurement and marking of marble mosaic tiles are pivotal to achieving precise cuts. Start by measuring the space where the tile will be placed using a tape measure, ensuring accuracy to the millimeter.
Once you have the exact measurements, transfer them onto the marble mosaic tile. Use a pencil or a non-permanent marker to draw the cutting line directly onto the tile.
When marking the tile, consider the grout line and make allowances for it in your measurement. If necessary, use a straightedge or ruler to guide your marking to ensure the cut line is straight and precise.
This initial preparation is crucial as it lays the groundwork for the cutting process, and accurate marking is intrinsic to the perfect fit and finish of the installed tiles.
Setting Up the Tile Cutter or Wet Saw
For cutting marble mosaic tiles, a wet saw or a tile cutter is an invaluable tool. The initial setup of these tools is a crucial step to ensure safety and precision in your work.
When setting up a wet saw, first make sure it’s placed on a steady, level surface. It’s important to ensure that the saw is unplugged while setting up to avoid any accidents.
Fill the reservoir of the saw with water – the blade of the wet saw needs to be constantly wet to prevent overheating and to reduce dust.
If you’re using a tile cutter, place it on a sturdy, flat surface as well. Adjust the guide on the cutter to match the size of the tile that you will be cutting. Always ensure your tools are clean and sharp, a dull blade can lead to uneven cuts and potential breakages.
Remember, the key to a successful and safe tile-cutting process lies in the proper setup, and this means taking the time to ensure your tools are ready for the job at hand.
Cutting Process
Credit: Getty Images/iStockphoto
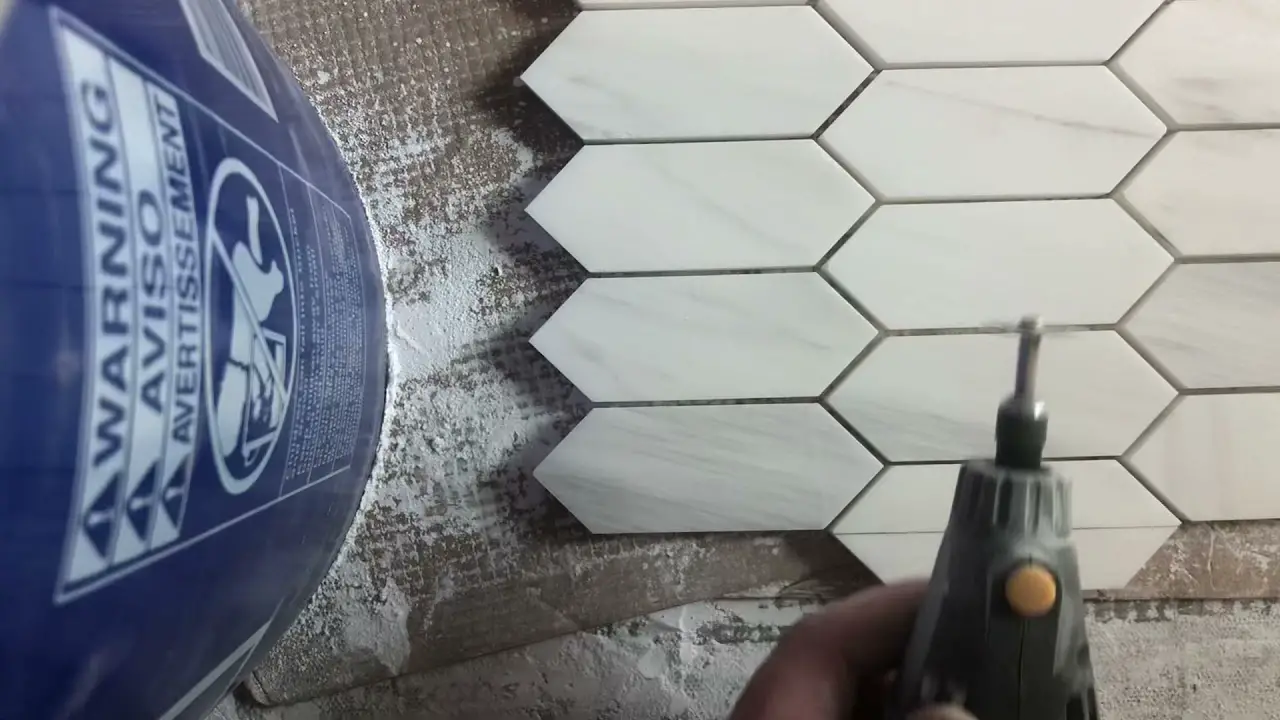
Step 1: Aligning the Tile
Start by placing your marked marble mosaic tile on the cutting platform of the wet saw or tile cutter. Align the marked line with the cutting blade, ensuring precision in your cut.
Step 2: Starting the Tool
Once aligned, power on the tile cutter or wet saw. Wait for the machine to reach full speed before proceeding to the next step. This is to ensure that your tool has enough power to cut through the tile without causing it to break or chip.
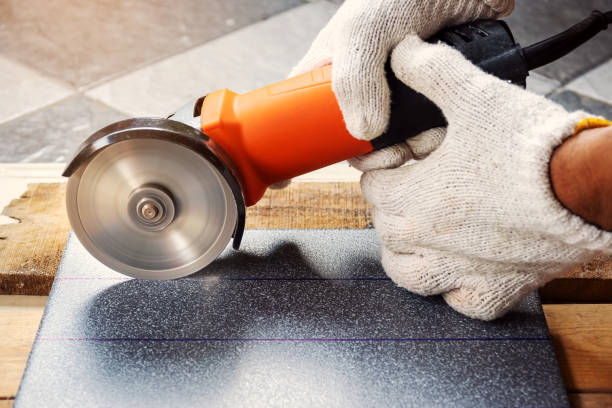
Step 3: Cutting the Tile
Slowly and carefully, guide the marble mosaic tile into the blade, following the marked line. Use steady pressure and let the tool do the work – avoid forcing the tile through as this can lead to uneven cuts or breakage.
Step 4: Completing the Cut
Continue cutting until you’ve completely separated the desired piece. Once the cut is complete, power off the machine and wait for the blade to completely stop before removing the tile.
Step 5: Smoothing the Edges
After the tile is cut, you will likely need to smooth out the cut edge. This can be done using sandpaper or a sanding stone. Rub the edge of the tile lightly until any sharp points or rough edges are smoothed out.
Handling Techniques to Prevent Tile Breakage
Handling marble mosaic tiles requires a gentle and calculated approach to prevent breakage. Use both hands when transporting a tile to distribute the weight evenly and avoid putting stress on one part of the tile.
When setting a tile down, do so gently to prevent any possible chipping or cracking from a hard impact. It’s also crucial to avoid dropping tools or other heavy items onto the tiles.
When cutting the tile, ensure the blade is sharp and set at the correct angle to avoid chipping or cracking. It is important to apply a steady, even pressure when guiding the tile through the blade, as forcing the tile can lead to breakages.
Once the cutting process is completed, be gentle when smoothing the edges. Use a sanding stone or sandpaper and apply light, even pressure.
Heavy-handed sanding can cause edges to chip, so take your time and be patient with this part of the process.
Related Topics:
Post-Cutting Process
Cleaning and Polishing the Cut Edges
After successfully cutting and smoothing your marble mosaic tiles, the next step is to clean and polish the cut edges. This task involves removing any residual dust or debris from the cutting process and then applying a suitable polishing compound to give your tiles a professional finish.
It’s important to use soft, non-abrasive cloths for this process to avoid scratching the marble.
Disposal of Waste and Leftover Materials
Once all cutting and polishing operations are finished, it’s time to properly dispose of any waste and leftover materials. Marble dust, offcuts, or broken tiles should be disposed of following local regulations.
Proper waste management ensures a safe working environment and is also an integral part of eco-friendly practices.
Conclusion
Mastering the art of cutting marble mosaic tiles is not just an invaluable skill for DIY enthusiasts, but also a rewarding experience for anyone looking to undertake home improvement or artistic projects. The process involves meticulous preparation, precise cutting, and careful finishing to achieve a perfect edge.
This comprehensive guide, which covers everything from selecting the right type of marble to the disposal of leftover materials, is designed to assist you every step of the way.
Working with marble mosaic tiles can not only enhance the aesthetic appeal of your project but also provide a sense of accomplishment as you see your project come to life. Remember, patience, precision, and the right tools are the key components for successfully cutting marble mosaic tiles.
FAQs
What tools are best for cutting marble mosaic tiles?
The ideal tools for cutting marble mosaic tiles include a wet saw with a diamond-tipped blade. This type of saw enables precise cuts without chipping the marble.
How can I ensure a smooth edge when cutting marble mosaic tiles?
To ensure a smooth edge when cutting marble mosaic tiles, polish the cut edges using a non-abrasive cloth and a suitable polishing compound. This will not only remove residual dust but also provide your tiles with a professional finish.
What is the safest way to dispose of waste after cutting marble mosaic tiles?
After cutting marble mosaic tiles, you should collect all marble dust, offcuts, or broken tiles and dispose of them under local regulations. Proper waste management ensures a safe working environment and contributes to eco-friendly practices.