Covering mosaic tiles can be a daunting task, especially when you’re seeking to preserve the underlying design while adding a touch of modern flair. This guide will provide step-by-step instructions on how to cover mosaic tiles, ensuring that even beginners can complete this home improvement project with relative ease and confidence. From selecting the right materials to the final touches, we’ve got you covered.
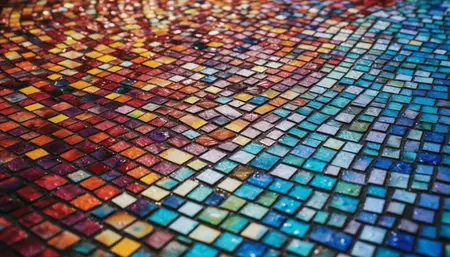
Mosaic tiling is a decorative art form that involves creating images or patterns using small pieces of colored tiles. These tiles, often made from materials such as glass, ceramic, or stone, are typically square and less than an inch in size.
The use of mosaic tiling traces back to ancient civilizations and offers an aesthetic appeal that has stood the test of time. Today, mosaic tiles are commonly used in kitchens, bathrooms, and other spaces where a durable and visually appealing surface is desired.
Essential Tools and Materials
- Primer: A high-quality primer will help prepare the mosaic tiles for the covering process, ensuring better adhesion of the new surface.
- Microfiber cloth: This will be used to clean and dust off the mosaic tiles before applying any product.
- Tile adhesive: This is a special type of glue that binds the new cover to the mosaic tiles firmly.
- New tile covers: Choose the style and color that best suits your interior design.
- Tile cutter: This tool is crucial for cutting the new tile covers to fit perfectly over your existing mosaic tiles.
- Notched trowel: Used for applying the tile adhesive evenly.
- Grout: This material is used to fill the spaces between the new tiles and provide a smooth, finished look.
- Grout float: This tool helps apply grout efficiently and smoothly.
- Sealant: A waterproof sealant will protect your new tiles from moisture and ensure their longevity.
- Safety gear: Always remember to use safety glasses, gloves, and a dust mask to protect yourself during the process.
Preparation
Before starting the covering process, it’s essential to ensure that the mosaic tiles are clean, dry, and free of dust or debris. Here are the detailed instructions:
Remove any old sealant or grout:
Use a grout remover tool to carefully scrape away any old grout or sealant from the gaps between the mosaic tiles. Be careful not to scratch or damage the tiles in this process.
Clean the tiles:
Dip a microfiber cloth into a mixture of warm water and mild dish soap. Wipe down the mosaic tiles thoroughly, paying special attention to any stained or dirty areas. This will remove any grease, dirt, or residue that could interfere with the adhesion of the new covering.
Dry the tiles:
After cleaning, allow the tiles to dry completely. You can speed up the drying process by wiping the tiles with a dry cloth or using a fan. Make sure there is no standing water in the gaps between the tiles.
Apply primer:
Once the tiles are completely dry, apply a coat of primer using a paintbrush or roller. The primer will create a smooth and adhesive surface for the new tiles to stick to. Allow the primer to dry according to the manufacturer’s directions.
Inspect the tiles:
After the primer has dried, check the mosaic tiles for any remaining dust or debris. If necessary, repeat the cleaning and priming process until you have a clean and smooth surface ready for the new covering.
Applying the Adhesive
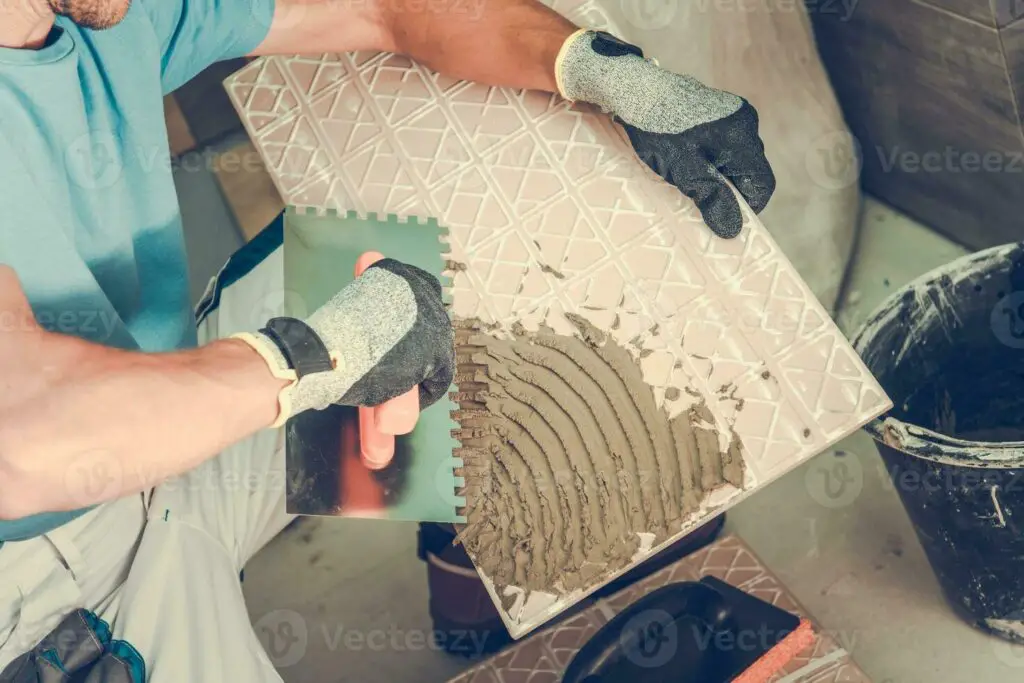
Start the process of applying the adhesive by gathering the necessary tools which include a notched trowel, adhesive (also known as thin-set or tile glue), and a mixing bucket. Follow the steps below:
Mix the adhesive:
Pour the adhesive powder into a mixing bucket, following the manufacturer’s instructions for the correct ratio of adhesive to water. Using a mixer attachment on a drill, stir the mixture until it reaches a thick, creamy consistency. Be sure not to overmix as it can introduce air bubbles that weaken the adhesive strength.
Let the adhesive rest:
Known as “slaking”, allow the mixed adhesive to sit for about 10 minutes. This will allow the chemicals to fully interact. After this rest period, give the adhesive one more quick stir.
Apply the adhesive to the tiles:
Using the flat side of the notched trowel spread a thin layer of adhesive onto a small section of the mosaic tiles. Then, angle the trowel at about 45 degrees and use the notched side to comb through the adhesive, creating uniform ridges. This helps to ensure a strong bond.
Take your time:
Work in small sections to prevent the adhesive from drying out before the new covering is applied. Remember to regularly clean the trowel to prevent adhesive build-up, which can affect the application of the adhesive.
Check the adhesive:
Now and then, lift a tile to check for full coverage. There should be no trowel lines and the back of the tile should be fully covered in adhesive.
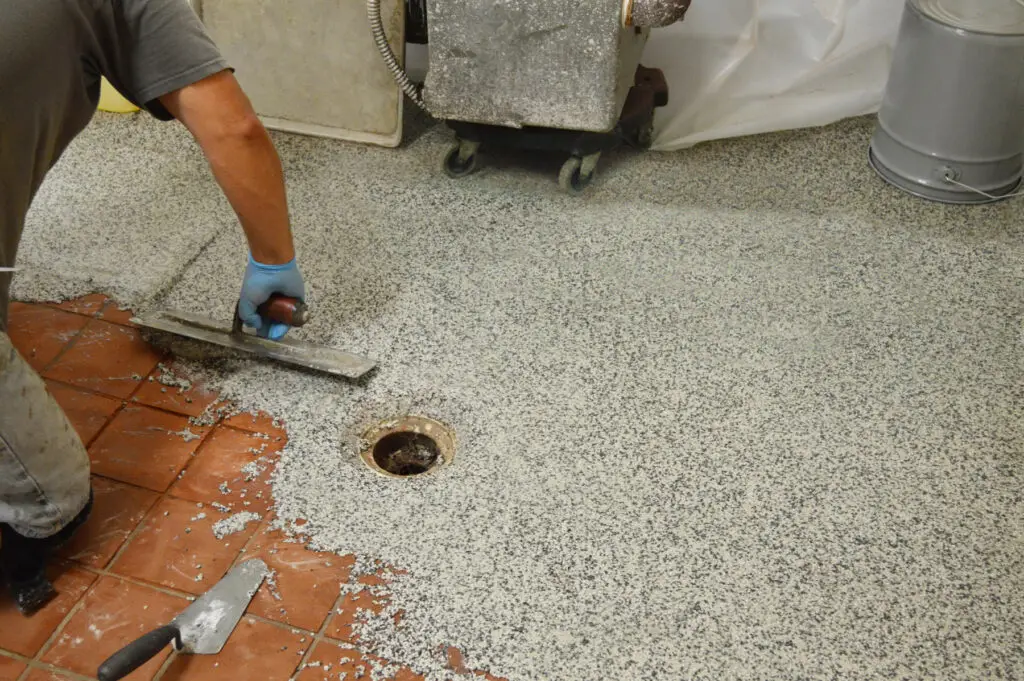
Covering the Mosaic Tiles

Credit: Getty Images/iStockphoto
Choose the Right Covering Material:
Before proceeding, it is important to choose an appropriate material to cover your mosaic tiles. This could be large format tiles, vinyl flooring, or even a layer of concrete depending on your design preference and the location of the tiles.
Position the Covering:
Next, you will need to carefully position your chosen covering over the adhesive-covered mosaic tiles. If you’re using large format tiles, start from the center and work your way out to ensure an even layout.
For vinyl or other flexible materials, roll out the covering and cut it to size with a utility knife.
Secure the Covering:
Once the covering is positioned correctly, press it down firmly into the adhesive. For tiles, use a tile float to press them into the adhesive, ensuring full contact and a strong bond.
If you’re using vinyl or another flexible material, a floor roller can be used to eliminate any air bubbles and ensure a secure fit.
Allow Time to Dry:
After the covering is secure, you must allow ample time for the adhesive to dry. The drying time can vary depending on the type of adhesive used, but generally, it’s a good idea to wait at least 24 hours before walking on the surface.
Finish the Job:
Once the adhesive is fully dried, you can finish the job. For tile coverings, this means applying grout to the spaces between the tiles and then wiping away the excess with a damp sponge.
For vinyl or other flexible materials, you may need to trim any excess material at the edges and then install baseboards or trim pieces to secure the edges and provide a finished look.
Curing and Sealing
After the covering material, whether it’s tile, vinyl, or other materials, is securely adhered and any grout or trim has been applied, an important final step is to let the tiles cure and then seal them.
Curing:
Curing is the process of allowing the adhesive and grout to fully harden and reach their maximum strength. This duration can vary greatly depending on the materials used and the environmental conditions, but typically, a period of 72 hours is recommended for the curing process.
It’s important to avoid walking on or disturbing the tiles during this period to ensure the strongest bond.
Sealing:
Once the tiles are cured, you should seal them to protect both the tile and the grout from moisture, stains, and daily wear and tear.
The sealing process involves applying a thin layer of sealant across the entire surface of the tiles. Use a foam paint roller or a sponge mop to evenly distribute the sealant, ensuring it penetrates the grout lines as well.
Let the sealant dry for at least 24 hours, or as indicated by the manufacturer’s instructions, before walking on the tiles.
Remember, the curing and sealing stages are crucial to the longevity and durability of your tile covering.
Related Topics:
Caring for Covered Mosaic Tiles
To keep your covered mosaic tiles looking their best and prolong their lifespan, it’s essential to conduct regular maintenance:
Regular Cleaning:
Grime and dirt can accumulate over time on the surface and in the grouting of mosaic tiles, so regular cleaning is key. Use a soft broom or vacuum to remove loose dust and debris.
A damp mop with warm water can also be effective for a more thorough cleaning. Avoid harsh chemicals as they may damage the sealant and the tile surface.
Periodic Sealing:
Depending on the wear and tear, you will need to reseal your mosaic tiles periodically. As a rule of thumb, resealing once every 1-2 years is recommended. This will help maintain their resilience against moisture and staining.
Promptly Addressing Stains and Spills:
Act immediately if any spill occurs. Blot the spill with a clean, damp cloth. Avoid rubbing as it can push the stain deeper into the tile or grout.
Avoiding Scratches:
Heavy furniture or sharp objects can cause scratches on mosaic tiles. Use furniture pads under heavy items and be careful when moving things across the tile surface.
Professional Cleaning:
Every few years, consider hiring a professional cleaning service to deep clean your tiles and grout. This will help maintain the tiles’ beauty and prolong their life.
By following these maintenance tips, you’ll ensure your covered mosaic tiles remain in top condition for many years to come.
Conclusion
Covering mosaic tiles is an excellent way to refresh and modernize your space while still preserving the enduring beauty of the mosaic art form.
This guide has provided comprehensive insights and step-by-step instructions to help you navigate through the process, from preparing the mosaic tiles to choosing and applying the right covering and ensuring its longevity through proper care.
Remember, the keys to a successful mosaic tile covering project are careful preparation, patience, and meticulous maintenance.
Whether you’re a seasoned DIY enthusiast or trying your hand at home improvement for the first time, you now have the knowledge needed to cover mosaic tiles confidently and effectively. Happy tiling!
FAQs
Can any type of cover be used for mosaic tiles?
Not all covers are suitable for mosaic tiles. Some may not adhere well, while others may alter the appearance of the mosaic drastically. It’s crucial to select a cover designed specifically for tiles, preferably one that is waterproof and durable.
What factors should I consider when choosing a cover for mosaic tiles?
When choosing a cover for mosaic tiles, consider the area where the tiles are installed (bathroom, kitchen, outdoor, etc.), the type of mosaic tile (ceramic, glass, stone, etc.), and the desired finish (glossy, matte, satin, etc.). Each of these factors can influence the type of cover that will work best.
How often should I clean my covered mosaic tiles?
Regular cleaning is key to maintaining the appearance and longevity of your covered mosaic tiles. For daily maintenance, a quick wipe with a damp cloth will suffice. In case of spills, clean them up as soon as possible to prevent staining. A deeper cleaning with a tile-specific cleaner can be done monthly. However, abrasive or acidic cleaners should be avoided as they can damage the tile cover.