
Welcome to this comprehensive guide on how to install mosaic tiles with mesh backing. Whether you’re a seasoned DIY enthusiast or a first-time tiler, this step-by-step guide is designed to help you navigate the process with ease.
Mosaic tiles with mesh backing are popular for their aesthetic appeal and versatility, but installing them can be a bit tricky without the right knowledge. So, let’s delve into the nuances of this task to ensure a smooth and successful installation.
Mosaic tiles with mesh backing offer numerous advantages that make them an attractive choice for many homeowners and designers alike.
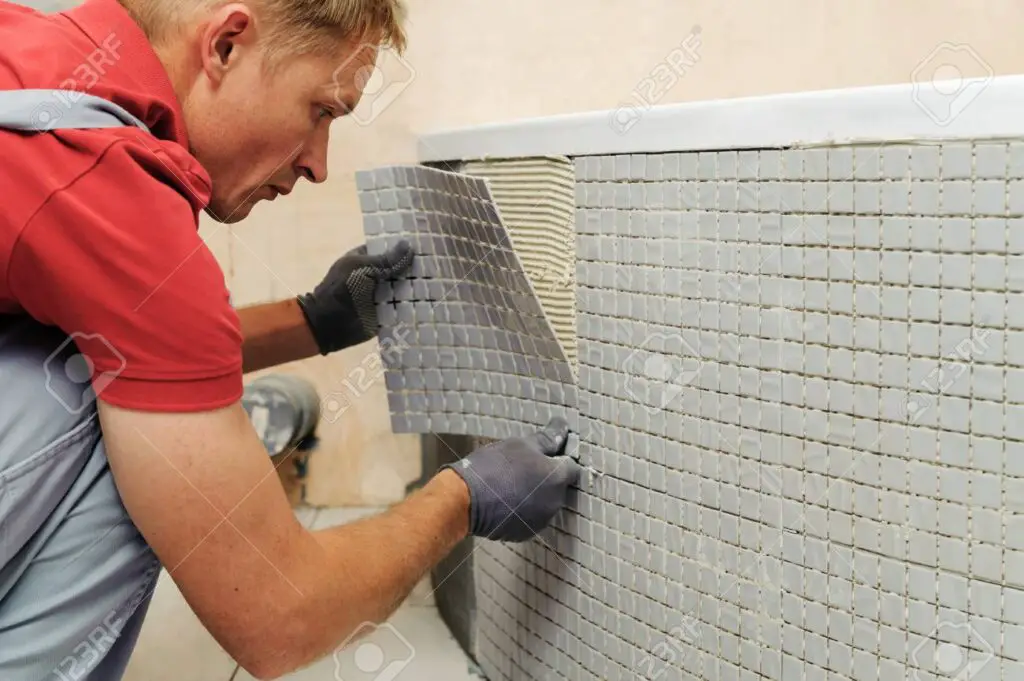
Firstly, the mesh backing significantly simplifies the installation process, allowing you to apply the tiles in large sections rather than individually. This not only speeds up the process but also ensures uniformity and precision.
Secondly, these tiles are versatile and can be used in various areas like the kitchen, bathroom, or even outdoor spaces without compromising on durability. Lastly, they come in a wide array of designs, colors, and materials, providing ample room for creativity and personalization.
Materials Needed
Required Tools and Materials
Before starting your tiling project, ensure you have the following tools and materials ready:
- Mosaic tiles with mesh backing: Choose the design and material that best fits your aesthetic and functional requirements.
- Adhesive: A high-quality tile adhesive is crucial for ensuring the longevity of your tiling work.
- Grout: This fills the spaces between the tiles, providing a finished look and additional stability.
- Notched trowel: This tool is used to spread the adhesive evenly on the surface.
- Sponge: A clean sponge is used to clean any excess grout off the surface of the tiles.
- Tile spacers: These will help you maintain uniform spacing between the tiles.
- Safety gear: Don’t forget safety glasses and gloves to protect yourself during the installation.
- Bucket: For mixing the adhesive and grout.
- Grout float: This tool is used to apply and press the grout into the spaces between the tiles.
- Level: To make sure your tiles are laid evenly and straight.
Preparation
Steps for Preparing the Surface for Tile Installation
Step 1: Clean the Surface

Begin by thoroughly cleaning the surface where you plan to install the tiles. Remove any dirt, grime, or loose particles that might interfere with the adhesive bonding process.
Step 2: Check for a Level Surface
Use a level to ensure that the surface is even. If the surface is uneven, consider using a self-leveling compound to correct it before proceeding with the installation.
Step 3: Dry Layout
Arrange the tiles on the floor or the wall where you plan to install them. This step, known as dry laying, helps you visualize the final layout and make any necessary adjustments.
Step 4: Mark Guidelines
Using a chalk line or laser level, mark guidelines on the surface according to the layout of the tiles. These guidelines will serve as reference points during the actual installation.
Step 5: Apply a Primer
If necessary, apply a primer to the surface. This enhances the bonding strength between the surface and the adhesive.
Step 6: Allow the Surface to Dry
After applying the primer, let the surface dry completely before proceeding with the tile installation. This ensures optimal bonding conditions.
Measuring and Marking the Installation Area

Step 1: Identify the Center Point
Start by identifying the center point of your installation area. This central point often serves as the starting point for tile installation, especially with mosaic tiles. Use a tape measure to find the middle of the wall or floor, both horizontally and vertically, and mark this point with a pencil.
Step 2: Measure the Tiles
Next, measure the length and width of your mosaic tiles, keeping in mind that the mesh backing may add a bit of extra size. If your tiles are on a sheet, measure the entire sheet, including any mesh that extends beyond the tiles.
Step 3: Create Reference Lines
Use these measurements to create reference lines on your installation surface. From the center point, measure out half the width and half the height of your tile or tile sheet, and make another mark.
Using a level, draw two lines intersecting at this mark: one vertical, and one horizontal. These lines will guide your tile placement, ensuring a centered and symmetrical installation.
Step 4: Check Your Work
Lastly, place your tiles or tile sheet along the reference lines to check your work. The tiles should align with the lines, and the layout should look balanced and even. If necessary, adjust your lines and repeat this step until you are satisfied with the layout.
Installing Mosaic Tiles
Apply the Adhesive
Start by mixing the tile adhesive according to the manufacturer’s instructions. Ensure that it has a smooth, paste-like consistency, which will allow it to bond effectively with the mosaic tiles. With a notched trowel, spread a thin, even layer of adhesive onto the installation surface.
Be careful not to cover your reference lines.
Spread Adhesive on Tiles
If your mosaic tiles have mesh backing, you can apply some adhesive directly onto the back of the tiles as well. This is particularly beneficial if the tiles are small or the surface is uneven. Spread a thin layer of adhesive on the mesh backing using the smooth edge of your trowel.
Aligning The Tiles
Now, carefully align the mosaic sheet with your reference lines, ensuring the corners of the tile sheet match the intersecting lines on the surface. Press the mosaic sheet onto the adhesive-covered surface.
Alignment is a crucial step in the process of installing mosaic tiles with mesh backing. Start from the center, where the reference lines intersect, and work your way outwards.
This method ensures that the tiles spread evenly across the surface. Place the tile sheet on the adhesive-covered area so the corners of the tile match the intersecting lines.
Gently press the sheet into the adhesive, working from the center out to the edges to remove any air pockets or excess adhesive. Use a grout float to press the tiles into the adhesive more thoroughly, ensuring a strong bond.
Make sure to check the alignment of each tile or tile sheet as you work, adjusting as necessary to maintain straight lines and even spacing.
Ensure Proper Adhesion
Once the tiles are in place, use a grout float or a similar flat surface to press down evenly across the entire tile sheet. This ensures all tiles are properly adhered to the surface and are at the same level.
Check Alignment
Finally, using a level, check the alignment of the tiles. If needed, adjust the tiles while the adhesive is still wet. Once satisfied, repeat the process with the next sheet of mosaic tiles, ensuring that the sheets align with each other and the tiles maintain a consistent pattern across the installation surface.
Grouting
Prepare the Grout
Prepare the grout as per the manufacturer’s instructions. It’s typically a mixture of water and grout powder until it reaches a peanut butter-like consistency. Make sure to mix enough grout to cover the entire area without having to stop and mix more.
Apply the Grout
Using a grout float, apply the grout at a 45-degree angle to the tile surface. Spread the grout over the tiles, forcing it into all the spaces between the tiles. This step ensures comprehensive coverage and a solid grouting job.
Remove Excess Grout
After letting the grout set for about 10-15 minutes or as per the manufacturer’s instructions, start to remove the excess grout. Hold the grout float at a 90-degree angle and move it diagonally across the tiles. This will not disrupt the grout lines and will remove the excess grout from the tile surface.
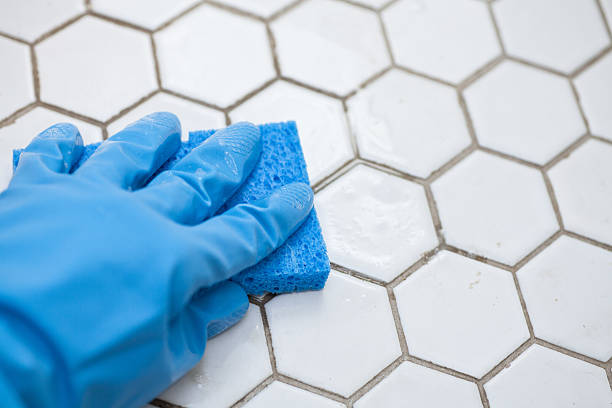
Clean the Surface
Once you’ve removed the excess grout, wait for another few minutes before cleaning. Then, with a damp sponge, clean the mosaic tiles in a circular motion. Rinse the sponge frequently in clean water to ensure a clean finish.
Final Cleaning
After the grout has dried completely, there may be a thin haze left on the tiles. Clean this off using a soft cloth or cheesecloth. Buff the tiles until they are clean and shining, being careful not to disturb the grout lines.
Seal the Grout
Once the grout has fully dried, apply a grout sealer to protect it from moisture and staining. Follow the manufacturer’s instructions for application and drying time.
Sealing the grout is an essential step in the process of installing mosaic tiles with a mesh backing. The grout sealer acts as a protective barrier, preventing moisture from seeping in, which could lead to mildew or mold growth.
It also guards against staining, ensuring that your newly installed mosaic tiles continue to look fresh and vibrant over time.
To apply the sealer, ensure the grout is completely dry. Use a small brush or sealer applicator and carefully apply the sealer to the grout lines, avoiding the actual tiles as much as possible.
Since mosaic tiles often have many small grout lines, this can be a detailed and meticulous task. Be sure to allow sufficient time for the sealer to dry fully, as per the manufacturer’s instructions, before stepping or placing anything on the surface.
Remember, grout sealer isn’t permanent and will need to be reapplied periodically, typically once a year, depending on the wear and tear of the area. By properly maintaining and sealing your grout, you can ensure the longevity of your mosaic tile installation.
Related Topic: A Comprehensive Guide to Mosaic Tiles
Finishing Touches
Apply Sealant (If Necessary)
Some mosaic tiles may require a sealant application, especially if they are made of natural stone or porous materials. If your tiles need sealing, it’s crucial to do this after the grout sealer has fully dried.
Follow the manufacturer’s instructions for the appropriate sealant and its application. Use a foam brush or a soft cloth to gently apply the sealant over the tiles, taking care to avoid the grout lines.
Allow the sealant to dry for the time specified by the manufacturer before walking on or placing anything on the tiles. This extra step ensures your mosaic tiles with mesh backing maintain their beauty and durability, allowing you to enjoy them for years to come.
Remember to reapply the sealant as recommended by the tile manufacturer, as its effectiveness can wear off over time.
Tips for Cleaning and Maintaining Mosaic Tiles
Mosaic tiles, despite their attractiveness and durability, require regular maintenance to uphold their beauty. Here are some tips to help you keep your mosaic tiles in top shape:
Daily Cleaning: Using a soft cloth, gently wipe the tiles to remove dust and loose debris. Avoid abrasive materials that could scratch the tiles.
Deep Cleaning: For a more thorough clean, use a mild, non-acidic soap or tile cleaner. Apply it with a soft, damp cloth, then rinse thoroughly with warm water to avoid leaving a soap residue. Be sure to dry the tiles properly to prevent water spots or streaks.
Avoid Harsh Chemicals: Harsh chemical cleaners can damage the sealant and dull the shine of your mosaic tiles. Always opt for pH-neutral cleaners, which are safe for both the tiles and grout.
Sealant Check: Regularly check the condition of the sealant. If it’s wearing off or if the tiles start to appear dull or absorb moisture, it’s time to reapply the sealant following the manufacturer’s instructions.
Professional Cleaning: Consider professional tile and grout cleaning services for an in-depth cleaning periodically. This can help maintain the longevity and aesthetic appeal of your mosaic tiles.
Remember, proper maintenance is key to ensuring the beauty and durability of your mosaic tiles with mesh backing.
Conclusion
In conclusion, installing mosaic tiles with mesh backing doesn’t have to be daunting. With patience, the right tools, and a step-by-step approach, you can transform your space with this unique and versatile design element.
Remember, the mesh backing simplifies the installation process, offering a practical yet aesthetically pleasing solution for your tiling needs.
Regular maintenance, including daily cleaning, avoiding harsh chemicals, and routinely checking the sealant, helps maintain the longevity and beauty of your mosaic tiles. Whether you’re refreshing your kitchen, bathroom, or outdoor space, mosaic tiles with mesh backing are a distinguished choice.
Armed with the knowledge from this guide, you are now ready to embark on your tile installation journey.
FAQs
Can I install mosaic tiles with mesh backing by myself?
Yes, you can install mosaic tiles with mesh backing by yourself. However, it requires patience, the right tools, and a step-by-step approach. Ensure you have all the necessary supplies before you start, and take your time to avoid any complications during the process.
What’s the best way to maintain the shine of my mosaic tiles?
To maintain the shine of your mosaic tiles, always opt for pH-neutral cleaners. Harsh chemicals can damage the sealant and dull the shine of your tiles. Regularly check the condition of the sealant, and reapply following the manufacturer’s instructions when necessary.
How often should I opt for professional tile and grout cleaning services?
It’s recommended to opt for professional tile and grout cleaning services periodically. The exact frequency depends on the use and environmental conditions your tiles are exposed to, but generally, a professional deep clean every 12-18 months can help maintain the longevity and aesthetics of your mosaic tile.
1 thought on “How To Install Mosaic Tiles With Mesh Backing”