Grout can certainly work wonders, filling in the gaps between our beautiful mosaic tiles and providing a degree of protection against water and debris. However, when left to dry on the surface of your tiles, it can be a real eyesore and potentially damage the aesthetic of your mosaic masterpiece.
Whether you’re dealing with a minor spill or a major mishap, this guide will walk you through the process of effectively removing dried grout from your mosaic tiles, restoring their original charm and vibrancy.
Proper removal of excess grout is not merely an exercise in aesthetics it’s a vital step in maintaining the integrity and longevity of your mosaic tiles. Left unchecked, hardened grout can lead to a dull and diminished appearance, obscuring the intricate details and vibrant colors that make your mosaic truly stand out.
Additionally, dried grout on the tile surface can become a stubborn residue that attracts dirt, dust, and grime. This can make your tiles challenging to clean and maintain in the long run.
Hence, it’s essential to effectively remove dried grout to preserve the visual appeal and hygiene of your mosaic tiles.
Safety Precautions
Wearing Protective Gear
Before you begin the process of removing dried grout from your mosaic tiles, it’s crucial to protect yourself. Donning the right safety gear, including gloves to protect your hands from sharp tile edges and chemicals, and safety goggles to shield your eyes from dust particles and debris, is essential.
This way, you can ensure your safety while maintaining the pristine condition of your mosaic tiles.
Ensuring a Ventilated Workspace
Working in a well-ventilated area is equally important when undertaking this task. The dust and small particles that might be released during the grout removal process can be harmful if inhaled.
Moreover, if you choose to use a chemical grout remover, these products often have strong odors that can cause discomfort or health concerns when used in confined spaces. Therefore, ensure you open windows and doors, or use a fan to facilitate air circulation while you work.
Equipment Needed
For the safe and effective removal of dried grout from your mosaic tiles, you’ll need the following tools:
- Grout Saw or Scraper: This tool is essential for scraping off larger chunks of dried grout. It’s designed to be gentle on your tiles while being tough on grout.
- Sponge: A sponge is needed to wipe off the loosened grout particles from the tile surface.
- Mild Detergent or Grout Haze Remover: These cleaning agents will help to dissolve any remaining grout residue, ensuring a sparkling clean finish.
- Warm Water: Warm water aids in the dissolution of the detergent or grout haze remover, making the cleaning process more effective.
- Scrubbing Brush: A scrubbing brush with firm bristles will help you to thoroughly clean the tile surface, ensuring every trace of grout is removed.
Procedure
Step 1: Preparing the Area and Equipment
Before you begin, ensure that all the necessary tools are within easy reach. Prepare a bucket of warm water and mix in the detergent or grout haze remover according to the manufacturer’s instructions.
Step 2: Scrubbing off the Dried Grout
Start by using your grout saw or scraper to gently scrape off the larger chunks of dried grout from the mosaic tiles. Be careful not to apply too much pressure as you could scratch or damage your tiles.
Always follow a systematic approach when scrubbing off the dried grout. Work on a small area at a time, to ensure thorough cleaning and avoid any potential damage to the tiles.
As you scrape, hold the grout saw or scraper at a slight angle, using its edge to get underneath the dried grout. This will allow you to lift and remove the grout with greater ease. Remember, the goal is to eliminate the grout from the surface, not to dig into the spaces between the tiles.
Once you’ve scraped off as much grout as possible, use the scrubbing brush dipped in the warm water-detergent mixture to scrub the area and remove any remaining grout or residue.
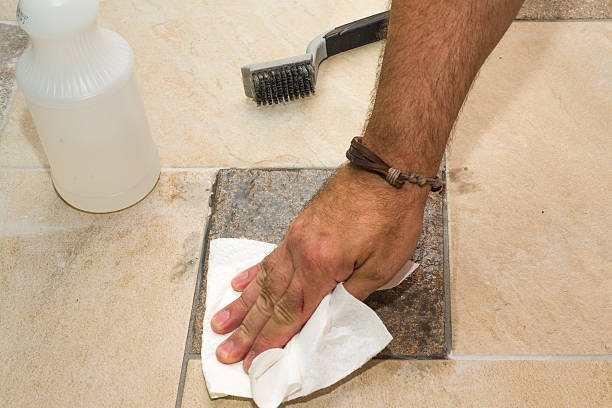
Step 3: Wiping the Tiles
After scraping, use a sponge to wipe off the loosened grout particles from the tile surface. Rinse the sponge in the bucket of warm water regularly to prevent redistributing the grout onto the tiles.
Once you’ve scraped off as much of the dried grout as possible, it’s time to focus on the finer details. Dampen your sponge in the warm water and detergent solution, making sure to squeeze out excess liquid.
Start at one corner of your mosaic tiles and gently but firmly wipe the sponge across the surface in a circular motion. This action will help to loosen any remaining grout particles from the tile surface.
Remember to rinse the sponge frequently in your bucket to avoid smearing grout back onto the tiles. Continue this process until all tiles are clean. In the case of stubborn grout residue, you can use your scrubbing brush with firm bristles to scrub the affected areas gently.
Step 4: Applying Cleaning Solution
Next, apply the detergent or grout haze remover solution onto the tiles. Let the solution sit on the tiles for a few minutes to dissolve the remaining grout.
To apply the cleaning solution, pour a small amount onto a clean, non-abrasive cloth or sponge. Begin at one corner of the mosaic tiles, then gently but thoroughly rub the solution into the tile surface, ensuring all areas are covered.
Be sure to work in manageable sections to prevent the solution from drying before it has done its work. After the solution has been applied, let it sit for the recommended time as per the product’s instructions.
This resting period allows the cleaner to break down the stubborn grout haze. However, be careful not to let the solution dry on the tiles, as this could make the removal process harder.
Step 5: Scrubbing the Tiles
Once the cleaning solution has had a chance to dissolve the remaining grout, use the scrubbing brush to thoroughly clean the tile surface. Scrub in a circular motion to ensure all traces of grout are removed.
After the cleaning solution has sufficiently dissolved the remaining grout, it’s time to scrub the tiles. Begin by applying moderate pressure and scrubbing in small, circular motions.
Your focus should be on the grout lines and areas with stubborn grout stains. For smaller, hard-to-reach areas, consider using an old toothbrush. This will allow you to scrub away any remaining grout in the crevices without damaging the mosaic tiles.
Continue this process across the entire surface, working your way systematically from one section to another. Remember to frequently rinse your scrubbing brush to prevent redistribution of grout particles back onto the clean tiles.
After this detailed scrubbing, your tiles should be free of any dried grout.
Step 6: Final Rinse and Dry
Finally, rinse the tiles with clean water and dry them thoroughly. Ensure all cleaning agents and grout particles have been completely washed off. Your mosaic tiles should now be free from dried grout and look as good as new.
Related Topics:
Maintain Your Mosaic Tiles After Grout Removal
After successfully removing dried grout from your mosaic tiles, it’s crucial to establish a routine of regular maintenance to keep them looking their best.
Start by cleaning your mosaic tiles weekly using a sponge or cloth with warm water and a non-acidic detergent. This gentle cleaning process will help eliminate any surface dirt or grime without damaging the tiles.
Avoid using abrasive cleaners or tools that can scratch and dull the surface of your mosaic tiles.
When dealing with hard-to-remove stains or residues, opt for a mild, pH-neutral cleaning solution and gently scrub the area. Ringing the tiles after cleaning is essential, as leftover cleaning solutions ranging can attract dirt.
Sealing your mosaic tiles every 6-12 months is another crucial maintenance step. Applying a good quality sealer will provide an extra layer of protection against stains and damages, making your tiles easier to clean and maintain.
Lastly, be proactive. If you notice any loose tiles or grout, repair them immediately to prevent further damage. This proactive approach to maintenance will ensure the longevity and beauty of your mosaic tiles for years to come.
Conclusion
In conclusion, removing dried grout from mosaic tiles is a meticulous yet necessary task to retain the charm and longevity of your tiles. With the right tools and approach, you can effectively get rid of hardened grout without causing harm to your mosaic masterpiece.
This guide has provided a comprehensive walkthrough, from the preparation stage to the final rinse, ensuring your tiles remain clean and grout-free.
Moreover, by following the subsequent maintenance tips, you can keep the aesthetic appeal of your mosaic tiles intact for many years to come. Remember, maintaining the cleanliness of your tiles is just as crucial as the removal of dried grout.
After all, the beauty of mosaic tiles lies in their intricate details and vibrant colors, and nothing should obscure that beauty – not even dried grout.
FAQs
What is the best tool to use for removing dried grout from mosaic tiles?
A grout saw or scraper tool is typically recommended for removing dried grout from mosaic tiles. These specialized tools are designed to remove the grout without causing damage to the tiles. It’s important to use these tools gently and carefully to avoid scratching or otherwise damaging your tiles.
Can vinegar be used to clean dried grout off mosaic tiles?
While vinegar is a popular cleaning agent for many household tasks, it is not recommended for cleaning dried grout off mosaic tiles. Vinegar is an acid, and it can damage the surface of the tiles, leaving them dull and discolored over time.
How frequently should mosaic tiles be sealed to prevent grout from drying on the surface?
Mosaic tiles should typically be sealed every 6-12 months to provide an extra layer of protection against stains and grout. This frequency can vary based on the specific type of tile and the amount of wear and tear they experience. Sealing your tiles regularly will make them easier to clean and maintain, and it can prevent grout from drying on the surface.