
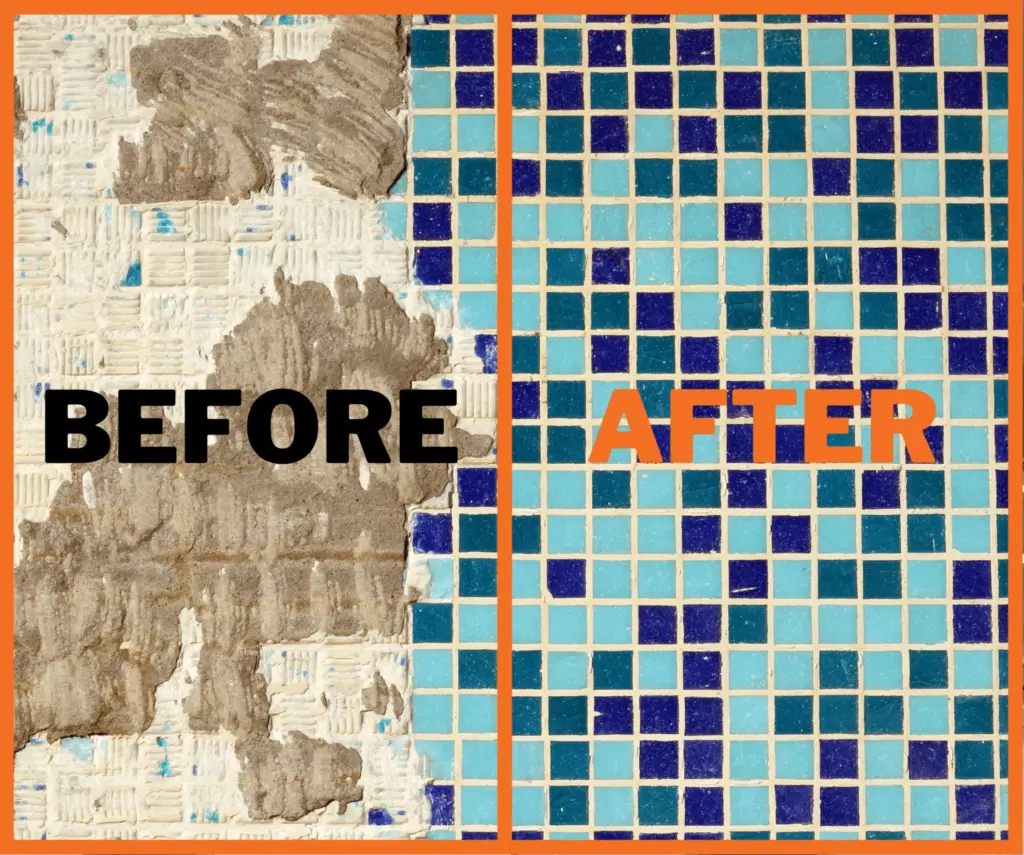
Mosaic tiles add an aesthetic touch to your swimming pool, but over time, they can become loose or damaged. Repairing these tiles is a task you can take on yourself with the right tools and a bit of patience.
This guide will walk you through the process of how to fix mosaic tiles in a swimming pool, helping you restore your pool’s beauty and functionality.
Mosaic tiles, widely favored for their vibrant colors and distinct aesthetics, serve as a significant component in swimming pool design.
They’re often used to create intricate patterns or images on the pool floor and walls, lending a unique charm and personal touch to the pool area. Besides aesthetics, these tiles also provide a non-slip surface, enhancing the safety of the pool.
Being resistant to the effects of pool chemicals and UV rays, mosaic tiles are not only durable but also a practical choice for swimming pool embellishment.
Identifying the Problem
Spotting Loose or Damaged Tiles
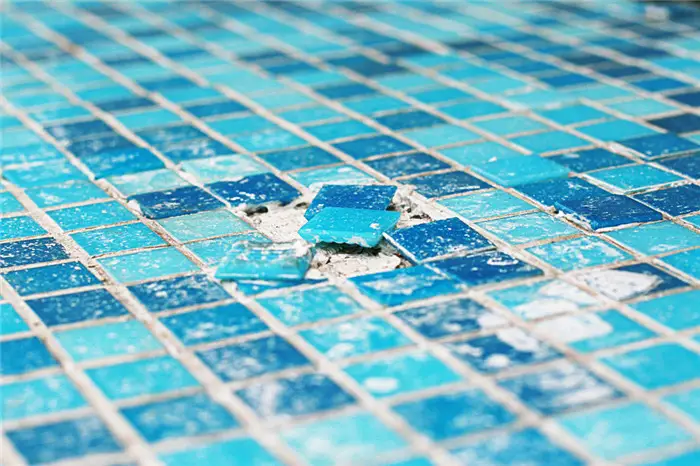
The first step in repairing mosaic tiles in your swimming pool involves identifying the problem areas. Loose or damaged tiles can typically be spotted by a visual inspection of your pool. Look for tiles that appear detached, cracked, or chipped.
In some cases, the grout surrounding the tiles might be missing or deteriorated, which can lead to tiles becoming loose. For a thorough inspection, it may be necessary to drain the pool to get a clear view of the tiles.
Determining the Extent of the Damage
After identifying the problem areas, the next step is to determine the extent of the damage. This involves assessing how many tiles are affected and the severity of their deterioration. If only a few tiles are loose or damaged, you may be able to replace just those tiles.
However, if a significant portion of the mosaic is affected, it may be necessary to replace a larger area to ensure a cohesive appearance and maintain the integrity of the pool surface.
Remember, when assessing the damage, safety should be your paramount concern. Loose or broken tiles can pose a risk for swimmers, so it’s crucial to address these issues promptly.
Materials Needed
To replace or repair mosaic tiles in your swimming pool, you’ll need the following tools and materials:
- Replacement Tiles: Ensure they match the existing mosaic tiles in size, color, and pattern.
- Tile Adhesive: A waterproof adhesive specifically designed for swimming pools.
- Grout: Choose a waterproof, pool-grade grout that matches the color of your existing grout.
- Grout Sealer: This will help protect the new grout from water and chemical damage.
- Grout Spreader and Sponge: Tools to help apply and clean up the grout.
- Tile Spacers: To keep an even distance between tiles during the installation process.
- Utility Knife: To remove old grout and damaged tiles.
- Safety Glasses and Gloves: These are essential to protect your eyes and hands during the repair process.
Removing Damaged Tiles

The first step in the safe removal of damaged mosaic tiles is to put on your safety glasses and gloves. These will protect your eyes from small shards of tile and your hands from sharp edges.
Start by using a utility knife to gently cut into the grout surrounding the damaged tiles. Be careful to avoid cutting too deeply, which could potentially damage the underlying surface or neighboring tiles.
The objective is to loosen the grout and create a clear separation between the damaged tiles and the adjacent intact ones.
Once you’ve cut through the grout around the damaged tiles, you may be able to gently lift the damaged tiles away from the surface. If the tiles are still firmly attached, you can use a small flat chisel and a gentle touch to pry them away.
Be careful not to apply too much force which may cause unnecessary damage to the surrounding tiles or pool surface.
After removing the damaged tiles, you should clean the area thoroughly to remove all remnants of old grout and adhesive. This will ensure that the replacement tiles adhere properly.
Use a sponge and clean water to wash any dust or debris from the area, then use a dry cloth to remove any remaining moisture before proceeding to install the new tiles.
Preparation for New Tiles
The success of the tile repair process largely depends on the cleanliness and preparation of the surface where the new tiles will be fixed. Any remaining debris, old adhesive, or grout on the surface can prevent the new tiles from adhering properly and can lead to premature loosening.
Start by using a stiff brush to scrub the area vigorously. This will help dislodge any leftover grout or adhesive. If remnants are stubborn, consider using a grout removal tool or a putty knife.
Be careful not to exert too much force that could damage the pool surface.
Next, rinse the surface with clean water. Using a hose, spray the area until all debris has been washed away. Ensure that the water pressure is not too high as it can damage the underlying surface.
After rinsing, it’s recommended to treat the surface with a mildewcide or other anti-fungal cleaner to prevent the growth of mildew beneath the new tiles. Apply the cleaner as per the manufacturer’s instructions and let it sit for the recommended time.
Rinse thoroughly with water and allow the surface to dry.
Before installing the new tiles, inspect the surface for any irregularities. The newly cleaned surface should be flat and smooth. If there are any minor dips or bumps, consider using a thin layer of pool repair mortar to level the surface.
Fixing New Mosaic Tiles
Step 1: Apply the Adhesive
Start by applying the adhesive to the surface. Use a notched trowel to spread a thin layer of waterproof tile adhesive over the area where the new tiles will be placed.
Hold the trowel at a 45-degree angle to ensure an even application. The notches in the trowel will leave ridges in the adhesive, which helps to key the tiles into place.
Step 2: Place the Tiles
Begin placing the mosaic tiles onto the adhesive. Press each tile firmly into the adhesive, ensuring it is level and fully bedded. Pay attention to maintaining consistent spacing between the tiles for the grout.
Ensure the mosaic tiles are positioned correctly before moving to the next. Use a tile spacer to maintain equivalent distances between tiles, providing a neat and even appearance once grouted.
After placing the tiles, gently tap each one with a rubber grout float. This will help embed them securely into the adhesive. Be cautious not to tap too hard as it may dislodge the tile or force adhesive through the grout spaces, which need to be cleaned for the grouting process.
Step 3: Adjust for Level and Alignment
After setting the tiles in the adhesive, use a tile level to check that they are flat and in line with the existing tiles. If necessary, adjust the tiles gently by pressing on them until they are level.
Step 4: Allow Adhesive to Set
Leave the adhesive to set. This usually takes 24 hours, but check the manufacturer’s instructions for the exact time. Avoid disturbing the tiles while the adhesive is drying.
Step 5: Apply the Grout
Once the adhesive has dried and the tiles are secure, mix the waterproof grout according to the manufacturer’s instructions. Apply it using a grout float, pressing the grout into the joints between the tiles. Wipe off the excess grout with a damp sponge, making sure not to leave any on the tile surfaces.
Step 6: Allow Grout to Dry
After grouting, allow for the grout to dry completely. This may take up to 48 hours. Once the grout has dried, clean the tiles with a damp sponge to remove any leftover grout haze.
Step 7: Seal the Grout
The last step in the process is to seal the grout, to protect it from moisture and chemicals in the pool water. Apply the sealant according to the manufacturer’s instructions.
Grouting the Tiles
Mixing the grout properly is a critical step in ensuring the longevity and durability of your mosaic tiles. Start by pouring the grout powder into a clean, dry bucket.
Slowly add water according to the manufacturer’s instructions, and mix thoroughly with a grout mixer or a drill with a mixing paddle attachment until you achieve a smooth, lump-free consistency similar to peanut butter.
Once the grout is thoroughly mixed, let it rest or “slake” for about 10 minutes. This allows the chemicals in the grout to fully activate, ensuring optimal performance. After the slaking period, give the grout one more quick mix.
With the grout prepared, you can begin applying it to the mosaic tiles. Using a grout float, spread the grout over the surface of the tiles, working it into all the spaces between the tiles.
Make sure that all gaps are filled and that the grout level is flush with the tile surface.
Work in small sections at a time to prevent the grout from drying out before it’s fully worked into the gaps. Once a section is complete, use the edge of your grout float to scrape off any excess grout from the surface of the tiles.
Next, use a damp sponge to further clean the surface of the tiles, removing any remaining grout. Be sure to rinse out your sponge frequently, and change the water as it becomes dirty. Continue this process until all the tiles are grouted and cleaned.
Related Topics:
Final Checks and Cleaning
After all the tiles have been grouted, it’s important to check that each tile is securely in place. Run your hand over the tiles to feel for any loose ones. If any tiles move or feel unstable, apply additional grout around them and press them firmly into place.
Allow the grout to dry according to the manufacturer’s instructions.
Once the grout has fully dried, you’ll likely notice a hazy film left on the surface of the tiles. This is residual grout and is normal. To clean this, dampen a sponge with water and gently scrub the surface of the tiles.
Be sure not to scrub too hard or you could damage the grout. Rinse the sponge frequently and change the water as needed. Continue this process until all residual grout is removed and the tiles are clean.
Congratulations! You’ve successfully fixed mosaic tiles in your swimming pool. With proper care and maintenance, your beautiful mosaic should last for many years.
Conclusion
In conclusion, mastering how to fix mosaic tiles in a swimming pool is an immensely valuable skill that can save you both time and money. This guide has provided a comprehensive breakdown of the process, ensuring you can tackle any loose or damaged mosaic tiles in your swimming pool.
Remember to always prioritize safety during the repair process and take your time to ensure the best possible outcome. Keep in mind that regular inspection and maintenance of the mosaic tiles can prevent minor issues from escalating into a significant problem.
With your newly fixed mosaic tiles, your swimming pool will return to its original splendor, ready for you to enjoy for many more years to come.
FAQs
How often should I inspect the mosaic tiles in my swimming pool?
Ideally, you should inspect the mosaic tiles every three months to ensure they are in good condition. More frequent inspections may be required if your pool is heavily used or exposed to harsh weather conditions.
Can I use any type of grout to fix the mosaic tiles in my swimming pool?
Not every type of grout is suitable for swimming pools. It’s essential to use waterproof grout, usually epoxy-based, to withstand constant exposure to water and chemicals commonly found in pool water.
What safety measures should be taken when fixing mosaic tiles in a swimming pool?
Make sure the pool is drained before starting the repair process. Use gloves to protect your hands from sharp mosaic edges and grout. Always work in a well-ventilated area as some grout products can emit strong fumes. Lastly, if you’re not comfortable with repairing yourself, it’s always wise to hire a professional.